Ultrasonic Distance Sensor Project using Arduino
The ultrasonic distance sensor project teaches you how to measure distances using ultrasonic sound waves. This is an essential skill for robotics, obstacle avoidance, and proximity-based automation systems.
IntermediateComponents Required
- Arduino Uno (or compatible board)
- HC-SR04 Ultrasonic Sensor
- Breadboard
- Jumper Wires
- USB Cable
Circuit Connections
Follow the steps below to connect the ultrasonic sensor with the Arduino board. The HC-SR04 has 4 pins: VCC, GND, TRIG, and ECHO.
- Connect the VCC pin of the sensor to the 5V pin on Arduino.
- Connect the GND pin of the sensor to the GND pin on Arduino.
- Connect the TRIG pin to digital pin 10 on Arduino.
- Connect the ECHO pin to digital pin 13 on Arduino.
- Double-check all connections before powering up the Arduino.
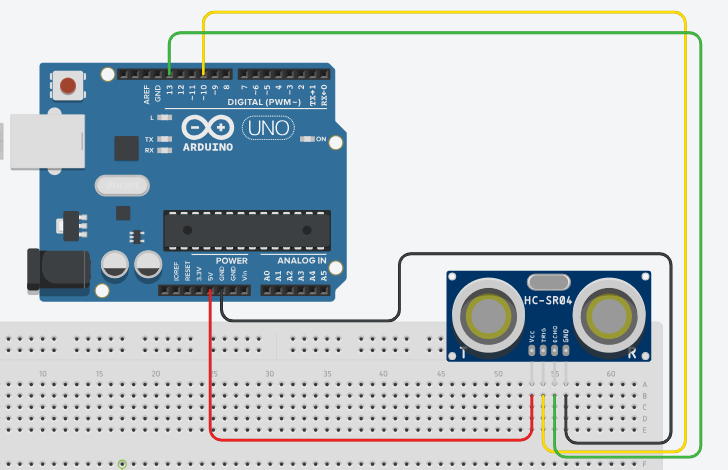
Here is the circuit diagram for reference. The TRIG pin sends the ultrasonic pulse, and the ECHO pin receives the reflected signal.
Arduino Code
/*
   Project: Ultrasonic Distance Sensor Project using Arduino
   Description: This project demonstrates how to use an ultrasonic sensor (HC-SR04) with

   Components:
     - Arduino Uno
     - HC-SR04 Ultrasonic Sensor
     - Breadboard
     - Jumper Wires
     - USB Cable
   Author: Circuit Creation RN

*/
//This code reads the distance from the HC-SR04 ultrasonic sensor and prints it to the Serial Monitor in centimeters.


const int trigPin = 10;
const int echoPin = 13;

void setup() {
  Serial.begin(9600);
  pinMode(trigPin, OUTPUT);
  pinMode(echoPin, INPUT);
}

void loop() {
  // Clear the trigPin
  digitalWrite(trigPin, LOW);
  delayMicroseconds(2);

  // Set the trigPin on HIGH state for 10 microseconds
  digitalWrite(trigPin, HIGH);
  delayMicroseconds(10);
  digitalWrite(trigPin, LOW);

  // Read the echoPin, pulseIn() returns the duration (time for sound to travel)
  long duration = pulseIn(echoPin, HIGH);

  // Calculating the distance
  long distance = duration * 0.034 / 2;

  // Prints the distance in inches or centimeters
  Serial.print("Distance: ");
  Serial.print(distance);
  Serial.println(" cm");

  delay(500);
}
Upload the Code
- Connect the Arduino board to your computer using the USB cable.
- Open the Arduino IDE and paste the code into a new sketch.
- Select the correct board and port from the Tools menu.
- Click the Upload button.
- Open the Serial Monitor (Ctrl+Shift+M) to view distance readings.
- Move objects closer and farther from the sensor to see the distance change.
Code Explanation
Let us understand how the Arduino code works step by step. This will help you modify the project and build more advanced applications.
Defining Pins
const int trigPin = 10; and const int echoPin = 13;
define which pins the sensor is connected to.
setup() Function
The setup() function initializes Serial communication at 9600 baud,
sets trigPin as OUTPUT, and echoPin as INPUT.
Triggering the Sensor
First, we set trigPin to LOW for 2 microseconds to ensure a clean pulse. Then, we send a 10-microsecond HIGH pulse to trigger the sensor's measurement.
Reading the Echo
pulseIn(echoPin, HIGH) measures how long the ECHO pin stays HIGH.
This duration is proportional to the distance of the object.
Calculating Distance
The formula distance = duration * 0.034 / 2 converts the time
to distance in centimeters. The factor 0.034 is the speed of sound (343 m/s).
We divide by 2 because the sound travels to the object and back.
Serial Output
The distance values are printed to the Serial Monitor every 500 milliseconds
using the delay(500) function.
Common Mistakes & Troubleshooting
- Sensor not detecting objects: Check that the TRIG and ECHO pins are correctly connected to pins 10 and 13.
- Inconsistent or very high readings: Make sure both power and ground connections are secure. Loose connections cause noise.
- No output in Serial Monitor: Verify that the Serial Monitor baud rate is set to 9600 to match the code.
- Sensor reads zero distance: Ensure there is an object in front of the sensor. Ultrasonic sensors need something to reflect the sound.
- Wrong distance values: The sensor's accuracy depends on the speed of sound, which varies with temperature. For better accuracy, calibrate with known distances.
- Upload error: Make sure you have selected the correct Arduino board and COM port in the Tools menu.
What You Learned
- How ultrasonic sensors measure distance using sound waves.
- Understanding the TRIG and ECHO pins of the HC-SR04 sensor.
- Using
pulseIn()to measure pulse duration. - Converting time measurements to distance.
- Reading sensor data and displaying it on the Serial Monitor.
- Building projects for obstacle detection and distance measurement.
Project Ideas
- Obstacle Avoiding Robot: Use ultrasonic sensors to detect obstacles and move around them automatically.
- Distance Alarm: Set a threshold distance and trigger an LED or buzzer when objects get too close.
- Parking Assistant: Display distance readings to help users park their vehicles safely.
- Water Level Detector: Measure the distance to water surface to detect water levels in tanks.
- Gesture Control: Use distance changes to detect hand gestures for controlling devices.