Servo Motor Control Project using Arduino
The servo motor control project is an essential Arduino project that teaches beginners how to control servo motors. It helps you understand PWM signals, motor control, and how to program precise angular movement.
BeginnerComponents Required
- Arduino Uno (or compatible board)
- Servo Motor (SG90 or similar)
- Jumper Wires
- Breadboard
- USB Cable
- External Power Supply (optional, for larger servos)
Circuit Connections
Follow the steps below to connect the servo motor with the Arduino board. Make sure the Arduino is not connected to USB while wiring.
- Connect the servo motor's RED wire to the 5V pin on Arduino.
- Connect the servo motor's BROWN/BLACK wire to the GND pin on Arduino.
- Connect the servo motor's YELLOW/WHITE wire to digital pin 9 on Arduino.
- Double-check all connections before powering up the Arduino.
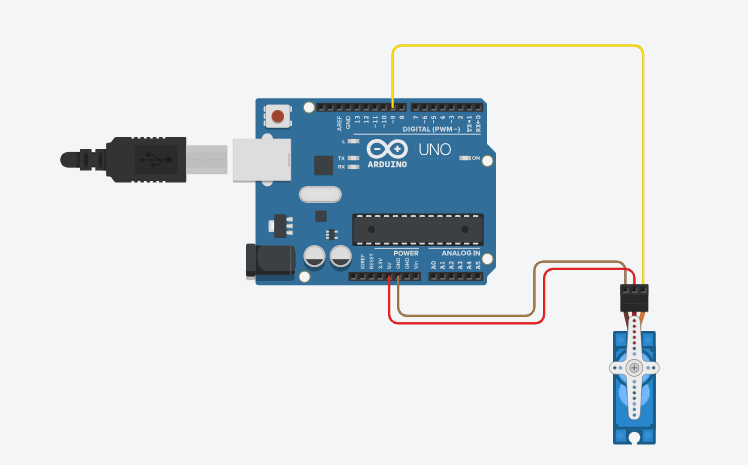
Here is the circuit diagram for reference. The servo signal pin is connected to PWM-enabled pin 9.
Arduino Code
/*
   Project: Servo Motor Control Project using Arduino
   Description: This project demonstrates how to control a servo motor using an Arduino board. The servo

   Components:
     - Arduino Uno
     - SG90 Servo Motor
     - Jumper Wires
     - Breadboard
     - USB Cable
     - External Power Supply (optional)
   Author: Circuit Creation RN

*/

This code uses the Servo library to control a servo motor connected to pin 9. The servo will sweep smoothly from 0 to 180 degrees and back.

 #include <Servo.h>

Servo myservo;
int pos = 0;

void setup() {
  myservo.attach(9);
}

void loop() {
  // Sweep from 0 to 180 degrees
  for (pos = 0; pos <= 180; pos += 1) {
    myservo.write(pos);
    delay(15);
  }

  // Sweep back from 180 to 0 degrees
  for (pos = 180; pos >= 0; pos -= 1) {
    myservo.write(pos);
    delay(15);
  }
}
Upload the Code
- Connect the Arduino board to your computer using the USB cable.
- Open the Arduino IDE and paste the code into a new sketch.
- Select the correct board and port from the Tools menu.
- Click the Upload button.
- The servo motor should start sweeping smoothly from 0 to 180 degrees.
Code Explanation
Let us understand how the Arduino code works step by step. This will help you modify the project later and build more advanced projects.
Including the Servo Library
#include <Servo.h> includes the Servo library which provides functions
to control servo motors using PWM signals.
Creating a Servo Object
Servo myservo; creates a Servo object named myservo that we will use
to control the servo motor.
setup() Function
The myservo.attach(9) function attaches the servo to pin 9.
Without this, the servo cannot be controlled.
loop() Function
The loop contains two for loops that sweep the servo from 0 to 180 degrees and back from 180 to 0 degrees, creating a smooth sweeping motion.
myservo.write() Function
The myservo.write(pos) function sets the servo to a specific angle.
The value ranges from 0 to 180 degrees.
delay() Function
The delay(15) pauses for 15 milliseconds between each degree change,
creating a smooth sweeping motion.
Common Mistakes & Troubleshooting
- Servo does not move: Check that the servo library is correctly included and the pin number matches your setup.
- Servo jitters or vibrates: Make sure your power supply is stable. Incorrect connections can cause power fluctuations.
- No power to servo: Verify the RED (power) and BLACK (ground) wires are connected to 5V and GND respectively.
- Servo moves erratically: Check if pin 9 is a PWM pin. Use PWM-enabled pins only (3, 5, 6, 9, 10, 11).
- Upload error: Make sure you have installed the Servo library. It comes with Arduino IDE by default.
What You Learned
- How to control a servo motor using Arduino PWM signals.
- Understanding the Servo library and its functions.
- Using
myservo.write()to set servo angles. - Creating smooth motor movements with delay commands.
- Building circuits with actuators and motors.