LED Pattern using Arduino
In this project, we will create different LED blinking patterns using Arduino.This project helps beginners understand how to control multiple LEDs using code.
BeginnerComponents Required
- Arduino Uno (or compatible board)
- 4 or 5 LED
- 4 or 5 × 220Ω resistors
- Breadboard
- Jumper Wires
- USB Cable
Circuit Connections
Follow the steps below to connect the LED with the Arduino board. Make sure the Arduino is not connected to USB while wiring.
- Connect the long leg (anode) of each LED to Arduino pins (8, 9, 10, 11).
- Connect the short leg (cathode) of each LED to GND through a resistor.
- Place all components on a breadboard.
- Connect Arduino GND to breadboard ground rail.
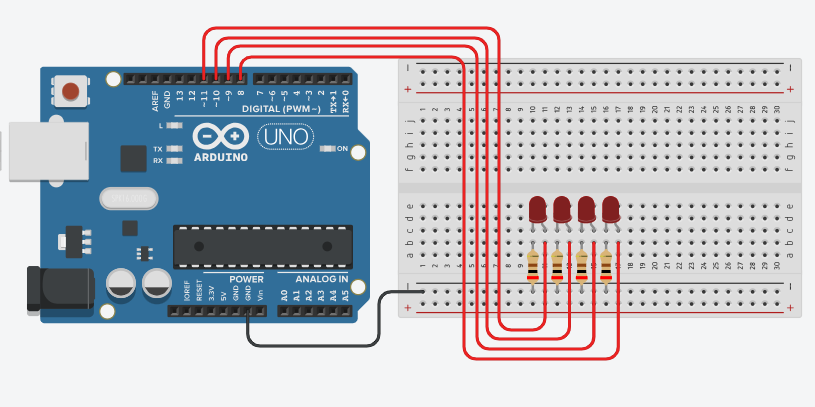
here is the circuit diagram for reference.
Arduino Code
/*
    Project: LED Pattern using Arduino
    description: Create a simple LED pattern using multiple LEDs and Arduino. This project is perfect for

   Components:
     - Arduino Uno
     - 4 LEDs
     - 4 × 220Ω resistors
     - Breadboard
     - Jumper Wires
     - USB Cable
   Author: Circuit Creation RN

*/

//this code creates a simple LED pattern by turning on one LED at a time in sequence.


int leds[] = {8, 9, 10, 11};

void setup() {
  for (int i = 0; i < 4; i++) {
    pinMode(leds[i], OUTPUT);
  }
}

void loop() {
  for (int i = 0; i < 4; i++) {
    digitalWrite(leds[i], HIGH);
    delay(200);
    digitalWrite(leds[i], LOW);
  }
}
Upload the Code
- Connect the Arduino board to your computer using the USB cable.
- Open the Arduino IDE and paste the code into a new sketch.
- Select the correct board and port from the Tools menu.
- Click the Upload button.
How It Works
When the Arduino starts, it prepares all the connected LED pins to work as outputs. This allows the Arduino to control when each LED turns ON or OFF.
The Arduino continuously runs the code inside the loop function. It turns ON the first LED, waits for a short time, and then turns it OFF. After that, the next LED is turned ON and the same process repeats.
Because this process happens in sequence and very quickly, the LEDs appear to light up one after another, forming a pattern.
The speed of the LED pattern depends on the delay value used in the program. Changing the delay time will make the LEDs blink faster or slower.
Code Explanation
In this project, we use multiple LEDs to create a simple blinking pattern. Each LED is connected to a different digital pin on the Arduino.
We store all the LED pin numbers inside an array. This allows us to control multiple LEDs easily using a loop instead of writing repeated code.
Inside the setup() function, we set all the LED pins as OUTPUT.
This tells the Arduino that these pins will send signals to the LEDs.
In the loop() function, the Arduino turns ON one LED at a time.
After a short delay, the LED is turned OFF and the next LED is turned ON.
This creates a running light or LED pattern effect.
The delay() function controls the speed of the pattern.
By changing the delay value, you can make the LEDs blink faster or slower.
Common Mistakes & Troubleshooting
- LED does not glow: Check the LED direction. The longer leg should be connected to the Arduino pin.
-
No blinking:
Make sure the correct pin number is used in the code.
If you are using another pin, update
ledPin. - Wrong resistor value: Use a 220Ω or 330Ω resistor. Very high or very low values may cause issues.
- Upload error: Select the correct board and COM port from the Arduino IDE Tools menu.
- LED very dim: Check loose connections on the breadboard and jumper wires.
What You Learned
- How to control multiple LEDs using Arduino.
- Using arrays to manage multiple output pins efficiently.
- How loops help reduce repeated code.
- Creating simple LED blinking patterns.
- Controlling timing and speed using the
delay()function.