LCD Display Project using Arduino
The LCD (Liquid Crystal Display) project allows you to display text and numbers on a screen using Arduino. This is a fundamental skill for creating user interfaces and showing sensor data in real-time on any Arduino project.
BeginnerComponents Required
- Arduino Uno (or compatible board)
- 16x2 LCD Display (HD44780 compatible)
- 10kΩ Potentiometer (for contrast adjustment)
- 220Ω Resistor (for LED backlight)
- Breadboard
- Jumper Wires
- USB Cable
Circuit Connections
Follow the steps below to connect the LCD with the Arduino board. Proper connections are essential for the display to work correctly.
- Connect the LCD VSS (pin 1) to GND.
- Connect the LCD VCC (pin 2) to 5V.
- Connect the 10kΩ potentiometer between 5V and GND, and connect its center pin to LCD V0 (pin 3).
- Connect the LCD RS (pin 4) to Arduino digital pin 12.
- Connect the LCD RW (pin 5) to GND.
- Connect the LCD E (pin 6) to Arduino digital pin 11.
- Connect the LCD D4 (pin 11) to Arduino digital pin 5.
- Connect the LCD D5 (pin 12) to Arduino digital pin 4.
- Connect the LCD D6 (pin 13) to Arduino digital pin 3.
- Connect the LCD D7 (pin 14) to Arduino digital pin 2.
- Connect the LCD A (pin 15) to 5V through a 220Ω resistor.
- Connect the LCD K (pin 16) to GND.
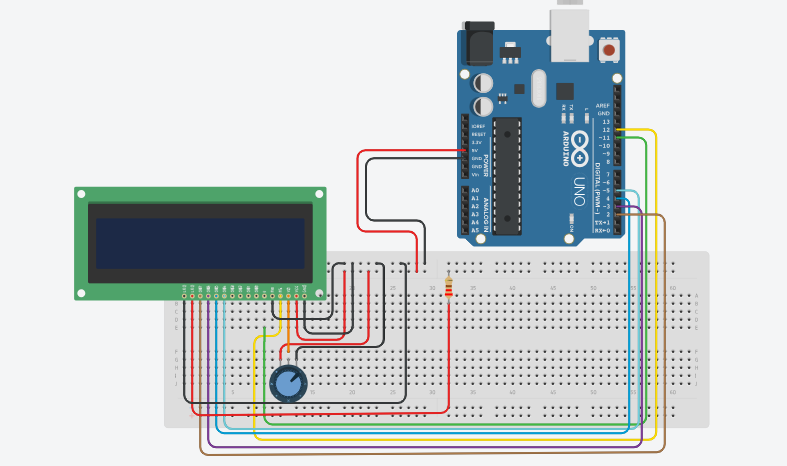
Here is the circuit diagram for reference.
Arduino Code
/*
    Project: LCD Display Project using Arduino
    description: Learn how to interface a 16x2 LCD display with an Arduino Uno.

   Components:
     -  Arduino Uno
     -  16x2 LCD Display
     -  10kΩ Potentiometer
     -  220Ω Resistor
     -  Breadboard and Jumper Wires
     -  USB Cable
   Author: Circuit Creation RN

*/

// This code will display "Hello World" on the LCD screen when the Arduino is powered on.

// Include the LiquidCrystal library
#include <LiquidCrystal.h>

// Initialize the library with LCD pin numbers
LiquidCrystal lcd(12, 11, 5, 4, 3, 2);

void setup() {
  // Set up the LCD's number of columns and rows
  lcd.begin(16, 2);

  // Print "Hello World" on the first row
  lcd.print("Hello World");
}

void loop() {
  // Nothing to do, just display the message
}
Upload the Code
- Make sure the Arduino IDE has the LiquidCrystal library installed (it's included by default).
- Connect the Arduino board to your computer using the USB cable.
- Open the Arduino IDE and paste the code into a new sketch.
- Select the correct board and port from the Tools menu.
- Click the Upload button.
- Once uploaded, you should see text display on the LCD screen.
- If the display is not visible, adjust the 10kΩ potentiometer for contrast.
Code Explanation
Let us understand how the Arduino code works step by step. This will help you modify the project later and display custom text.
Including the Library
#include <LiquidCrystal.h> includes the LiquidCrystal library
which provides functions to control the LCD display.
Initialize the LCD
LiquidCrystal lcd(12, 11, 5, 4, 3, 2); creates an LCD object
with the pins connected to the RS, E, D4, D5, D6, and D7 pins respectively.
setup() Function
The setup() function runs only once when the Arduino starts.
lcd.begin(16, 2) initializes the LCD with 16 columns and 2 rows.
lcd.print() displays text on the LCD starting from the current cursor position.
setCursor() Function
lcd.setCursor(x, y) moves the cursor to column x and row y.
This allows you to position text anywhere on the display.
loop() Function
The loop() function runs continuously.
Here, we display the elapsed time and a counter value that updates every 100 milliseconds.
clear() Function
lcd.clear() clears all text from the LCD display.
This is useful when you want to update the display with new information.
Common Mistakes & Troubleshooting
- No display at all: Check if the LCD is powered correctly. Verify 5V and GND connections.
- Garbled or unreadable text: Adjust the contrast using the 10kΩ potentiometer. Turn the potentiometer dial slowly until text becomes clear.
- Wrong pin connections: Double-check that all pins are connected according to the diagram. Even one wrong wire can prevent the display from working.
- Library not found: The LiquidCrystal library should be pre-installed with Arduino IDE. If not, install it from Sketch → Include Library → Manage Libraries.
-
Text not updating:
Make sure you use
lcd.clear()before displaying new text, otherwise old text may remain on the screen. - Upload error: Select the correct board and COM port from the Arduino IDE Tools menu.
What You Learned
- How to connect a 16x2 LCD display to Arduino.
- Using the LiquidCrystal library to control the display.
- Displaying text at specific positions on the LCD using
setCursor(). - Updating the display dynamically using
clear()andprint(). - Adjusting LCD contrast using a potentiometer.
- Creating user interfaces for Arduino projects with visual feedback.